[펌] TChart 기본정보 및 사용팁
컨텐츠 정보
- 36,710 조회
- 0 추천
-
목록
본문
0. 들어가기
TChart를 처음 접했을때 기초는 도움말과 예제등으로 어느정도 익혔습니다.
그런데 제가 꼭 필요로 했던 기능들이나 팁들은 자료찾기 어렵더군요.
이 글이 좀 허접할지라도 한분이라도 도움이 되었으면 좋겠습니다^^
기본 기능들은 첨부된 예제 소스를 보시면 쉽게 이해하실 수 있고, 몇가지 팁만 서술하겠습니다.
각 요소들을 다 설명할 수준이 못되서 도움말 참고하시면 좋을 듯 합니다.
1. TChart 중요 요소
(1) Panel(= TChart)
– 차트 배경. 색이나 바깥 테두리와 간격등을 설정 가능.
– TChart.Color, TChart.MarginLeft등
(2) TChart.Title
– 차트 제목. 기본 중앙 상단에 표시되며 위치, 글꼴등 변경 가능.
(3) TChart.Legend
– 범례. 기본 버전은 기능이 미약하여 거의 사용하지 않고 필요기능(보이기/감추기, 이름/색상변경등)을 추가하여 따로 만들어서 사용하는것이 좋음.
(4) TChart.Left Axis, TChart.BottomAxis
– 차트 축. Left(기본 Y축), Bottom(기본 X축) 외에 Right, Top등이 존재.
– (Property) Automatic, AutomaticMinimum, AutomaticMaximum : 데이터에 따른 축 눈금 자동 조절 여부.
– (Property) Minimum : 축의 최소 눈금. Maximum보다 크면 Error 발생.
– (Property) Maximum : 축의 최대 눈금. Minimum보다 작으면 Error 발생.
– (Property) MinimumOffset, MaximumOffset : 자동 축 조정시 눈금과 데이터간 조절.
최대 데이터가 10이고 MaximumOffset이 0%면 Maximum은 자동으로 10으로 설정됨.
최대 데이터가 10이고 MaximumOffset이 20%면 Maximum은 자동으로 12으로 설정됨.
– (Property) AxisValuesFormat : Label의 Format을 결정.
– (Function) AdjustMaxMin : 데이터에 따라 축 눈금 자동 조정.
– (Function) SetMinMax : 축의 최소, 최대 눈금 설정. Property로 설정 할 경우 직접 데이터가 크거나 작은지 체크해야함.
현재 Y축이 10~20으로 설정되어 있을때,
1~2로 설정하려면 Minimum을 먼저 설정해야 Error가 안나고,
100~200으로 설정하려면 Maximum을 먼저 설정해야 하는데 이 함수를 사용하면 직접 체크하지 않아도 됨.
(5) TChart.Series[]
– 차트의 그래프. Design Time에서 추가한 Series는 자동으로 Source상에 Class가 추가됨.
TForm1 = class(TForm)
Chart1: TChart;
Series1: TLineSeries;
– 동적으로 생성 가능.
var
s: TLineSeries;
begin
s := TLineSeries.Create(Chart1);
s.ParentChart := Chart1;
– 데이터 속성 : 그래프의 데이터 한개에는 총 4가지의 속성이 있습니다. 이거 이해못해서 한참 해맸습니다^^
Index : 데이터배열에 필요한 Index 정보. X축 좌측기준 0부터 시작.
Pos : 차트에 데이터가 위치하는 좌표(윈도우 화면 좌표가 아닌 차트 내부좌표). Double 형식. 스크롤이나 해당 위치에 선 그릴때 필요.
Value : Y축 데이터 값입니다. Double 형식.
Label : X축 Label 값입니다. Text 형식.
– (Property) Color : 그래프 색상.
– (Property) Title : 그래프 이름. 다른 그래프와 중복 가능.
– (Property) ValueList.ValueList[0] : X축 데이터의 Pos List. 하위 Items[]로 접근 가능.
– (Property) ValueList.ValueList[1] : X축 데이터의 Value List. 하위 Items[]로 접근 가능.
– (Property) LabelList : 데이터의 Label List. 하위 Labels[Index]로 접근 가능. 읽기 전용.
2. Scroll 기능 만들기
(1) 원리
– 데이터 추가 시, X축 좌표를 직접 입력하여 X축 설정을 통해 Scroll.
(2) 방법
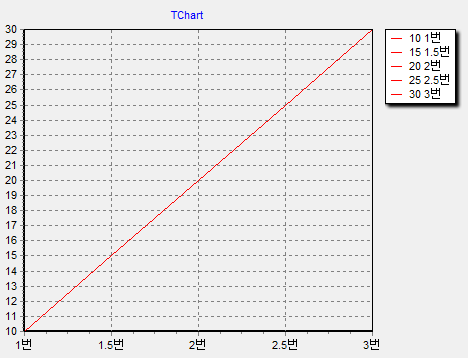
1) X축 좌표 입력하여 데이터 추가
s.AddXY(1, 10, ’1번’, clRed);
s.AddXY(2, 20, ’2번’, clRed);
s.AddXY(3, 30, ’3번’, clRed);
s.AddXY(1.5, 15, ’1.5번’, clRed);
s.AddXY(2.5, 25, ’2.5번’, clRed);

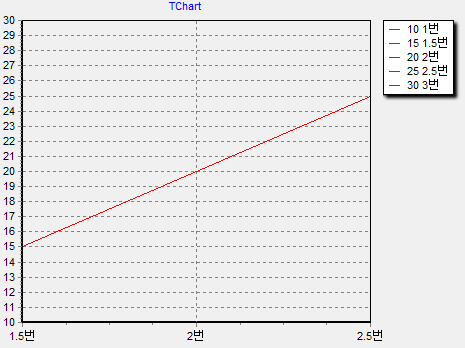
2) X축 범위 설정을 통해 Scroll 구현
Chart1.BottomAxis.SetMinMax(1.5, 2.5);
3. Label 변경
(1) 원리
– 데이터가 추가되고 Label List Class가 있지만 읽기전용으로 수정 불가능.
– GetAxisLabel Event를 통해 LabelText를 바꿀 수 있음.
(2) GetAxisEvent
procedure TForm1.Chart1GetAxisLabel(Sender: TChartAxis;
Series: TChartSeries; ValueIndex: Integer; var LabelText: string);
begin
end;
– Sender : 어떠한 축에서 Event가 발생되었는지 알 수 있음.
– Series : 어떠한 Series에서 Event가 발생되었는지 알 수 있음. 단, 데이터 등록시 Label을 입력하지 않으면 Series는 GetAxisLabel Event를 발생하지 않음.
– ValueIndex : 현재 표시되려는 Label의 Index를 알 수 있어 데이터에 접근 가능. 단, 데이터 등록시 Label을 입력하지 않으면 ValueIndex는 -1로 전송받음.
– LabelText : 표시 되려는 Label. 이 변수를 변경함으로써 표시되는 Label 변경 가능. 실제 내부 Label값은 변하지 않음. 이 LabelText의 Format은 해당 축의 (Property) AxisValuesFormat으로 결정됨.
(3) 방법
procedure TForm1.Chart1GetAxisLabel(Sender: TChartAxis;
Series: TChartSeries; ValueIndex: Integer; var LabelText: string);
begin
// Y축 Label 변경
if (Sender = Chart1.LeftAxis) then // Y축인지 검사
begin
LabelText := Format(‘[%s]‘, [LabelText]);
end;
// X축 Label 변경
if (Sender = Chart1.BottomAxis) and (Series = Series1) then // X축인지 검사 // Series 검사를 하지 않으면 예외 Label이 발생 할 수 있음.
begin
try
LabelText := FormatDateTime(‘hh:nn:ss’, StrToDateTime(LabelText));
except
LabelText := ‘Wrong Format’;
end;
end;
end;
4. 많은 데이터 처리
(1) 원리
– 데이터 추가시 Label을 입력하게 되면 데이터 개수가 많아질수록(약 1만개 이상) Chart Class가 전체적으로 느려짐.
– Label의 길이가 길어지면 더 빨리 느려지고, Label을 입력하지 않으면 속도가 아주 빠름.
– 데이터 추가시에는 Label을 입력하지 않고, GetAxisLabel을 통해 표현하는 방법이 최고 속도 구현. 이때 GetAxisLabel의 LabelText는 좌표값으로 표시됨.
(2) 방법
1) 데이터 추가
for i := 1 to 86400
s.AddXY(i, i * 10, ”, clRed);
2) Label 변경
procedure TForm1.Chart1GetAxisLabel(Sender: TChartAxis;
Series: TChartSeries; ValueIndex: Integer; var LabelText: string);
begin
// X축 Label 변경
if (Sender = Chart1.BottomAxis) and (Chart1.SeriesCount > 0) then // X축인지 검사
begin
LabelText := Format(‘%s번’, [LabelText]);
end;
end;
5. 시간 형식 Label 사용 및 시간 기준 Scroll
(1) 원리
– X축 Label 시간을 표시하는 방법
1) 데이터 추가시 Label에 시간 넣기
2) GetAxisLabel에서 시간 표시하기
– 빠른 속도를 위해 Label을 입력하지 않고 위치값에 TDateTime값을 입력하여 Label을 TDateTime으로 변환하여 표시
– 위치값을 시간으로 입력하면 SetMinMax 함수를 통해 시간 기준 Scroll 가능
(2) 방법
1) 데이터 추가
dtPivot: TDateTime;
var
i: integer;
dtAdd: TDateTime;
begin
Series1.Clear;
dtPivot := Now; // 전역변수에 마지막 시간을 입력한다.
dtAdd := dtPivot;
for I := 1 to 86400 do // 1초마다 24시간 만큼 추가
begin
Series1.AddXY(dtAdd, i, ”, clRed);
dtAdd := dtAdd – (1/24/60/60); // 1초 감소
end;
end;
2) 시간 표시
procedure TForm1.Chart1GetAxisLabel(Sender: TChartAxis;
Series: TChartSeries; ValueIndex: Integer; var LabelText: string); // Label이 없게 데이터를 추가하면 ValueIndex는 항상 -1로 넘어옴.
var
dtLabel: TDateTime;
dDT: double;
begin
if (Sender = Chart1.BottomAxis) and (Chart1.SeriesCount > 0) then
begin
try
dDT := StrToFloat(LabelText);
dtLabel := dDT;
LabelText := FormatDateTime(‘hh:nn:ss’, dtLabel);
except
LabelText := ‘Error’;
end;
end;
end;
3) Scroll
var
dtBegin, dtEnd: TDateTime;
begin
dtBegin := dtPivot – ((1/24/60/60) * 10); // 마지막 시간 기준 10초 전으로 설정
dtEnd := dtPivot; // 마지막 시간으로 설정
if Chart1.Zoomed = false then // Zoom이 안되어 있을때만 스크롤
Chart1.BottomAxis.SetMinMax(dtBegin, dtEnd);
4) Zoom 해제 시, Scroll 영역 설정
procedure TForm1.Chart1UndoZoom(Sender: TObject);
var
dtBegin, dtEnd: TDateTime;
begin
// Zoom이 풀릴때 스크롤중이라면 범위를 맞춘다.
if IsScroll then
begin
dtBegin := dtPivot – ((1/24/60/60) * 9);
dtEnd := dtPivot;
Chart1.BottomAxis.SetMinMax(dtBegin, dtEnd);
end;
6. 선긋기
(1) 원리
– CalcXPosValue, CalcYPosValue 함수를 통해 축의 위치값에 해당하는 화면 좌표를 얻을 수 있음.
– 해당 좌표를 이용하여 가로선, 세로선, 사각형, 글자를 AfterDraw 이벤트에서 Draw.
(2) 방법
procedure TFrameLine.Chart2AfterDraw(Sender: TObject);
var
x, y, i, xcc, ri, j:integer;
dtBegin, dtEnd: TDateTime;
sChamber: String;
sLabel, sLabel2: String;
// 범위용
rT: TRect;
begin
// 가로선
if IsHorzLine then
begin
// Y축 5에 해당하는 좌표얻기
y := Chart2.LeftAxis.CalcYPosValue(5);
if (y >= Chart2.ChartRect.Top) and (y <= Chart2.ChartRect.Bottom) then
begin
// 선 색상 지정
Chart2.Canvas.Pen.Color := clPurple;
// 폰트 색상, 글꼴, 크기 지정
Chart2.Canvas.Font.Name := ‘Arial’;
Chart2.Canvas.Font.Color := clPurple;
Chart2.Canvas.Font.Size := 8;
// Y축 왼쪽부터 오른쪽까지 선긋기
Chart2.Canvas.MoveTo(Chart2.ChartRect.Left,y);
Chart2.Canvas.LineTo(Chart2.ChartRect.Right,y);
Chart2.Canvas.TextOut(Chart2.ChartRect.Right + 2, y – 6, ‘This is 5′); // +2, -6은 적절한 위치 설정은 위함
end;
end;
// 세로선
if IsVertLine then
begin
// X축 3초전 좌표얻기
dtBegin := dtPivot – ((1/24/60/60) * 3);
x := Chart2.BottomAxis.CalcXPosValue(dtBegin);
if (x >= Chart2.ChartRect.Left) and (x <= Chart2.ChartRect.Right) then
begin
// 선 색상 지정
Chart2.Canvas.Pen.Color := clBlue;
// 폰트 색상, 글꼴, 크기 지정
Chart2.Canvas.Font.Name := ‘Arial’;
Chart2.Canvas.Font.Color := clBlue;
Chart2.Canvas.Font.Size := 8;
// X축 위부터 아래까지 선긋기
Chart2.Canvas.MoveTo(x, Chart2.ChartRect.Bottom);
Chart2.Canvas.LineTo(x, Chart2.ChartRect.Top);
Chart2.Canvas.TextOut(x, 10, Format(‘This is %s’, [FormatDateTime('hh:nn:ss', dtBegin)]));
end;
end;
// 범위
if IsRange then
begin
// X축 6초전 좌표얻기
dtBegin := dtPivot – ((1/24/60/60) * 6);
// X축 3초전 좌표얻기
dtEnd := dtPivot – ((1/24/60/60) * 3);
// 사각 좌표 얻기
rT.Left := Chart2.BottomAxis.CalcXPosValue(dtBegin);
rT.Right := Chart2.BottomAxis.CalcXPosValue(dtEnd);
rT.Top := Chart2.ChartRect.Top;
rT.Bottom := Chart2.ChartRect.Bottom;
// Zoom 상태를 감안하여 표시 여부 설정
if (rT.Left <= Chart2.ChartRect.Right) and (rT.Right >= Chart2.ChartRect.Left) then
begin
if rT.Left <= Chart2.ChartRect.Left then rT.Left := Chart2.ChartRect.Left; // 좌측을 넘어가는 범위 자르기
if rT.Right >= Chart2.ChartRect.Right then rT.Right := Chart2.ChartRect.Right; // 우측을 넘어가는 범위 자르기
// 선 색상
Chart2.Canvas.Pen.Color := clGreen;
// 채우기 색상, 스타일
Chart2.Canvas.Brush.Style := bsDiagCross;
Chart2.Canvas.Brush.Color := clGreen;
// 상자 그리기
Chart2.Canvas.Rectangle(rT);
// 상단 중간에 글자 표시
Chart2.Canvas.Font.Name := ‘Arial’;
Chart2.Canvas.Font.Color := clGreen;
Chart2.Canvas.Font.Size := 8;
Chart2.Canvas.TextOut(rT.Left, 0, Format(‘This is %s ~ %s’, [FormatDateTime('hh:nn:ss', dtBegin), FormatDateTime('hh:nn:ss', dtEnd)]));
end;
end;
end;
관련자료
-
링크

